Vickers Hardness Tester (Automatic Hardness Testing)
The DUROLINE V-Series are based on the latest technology available, focused on fast cycle time with high reproduceable accuracy within international standards. The system features a smart and very service-friendly synergy of a robust and proven mechanical construction with load cell force control and integrated electronics system control featured by a fast CANBUS technology and a high-quality Windows based mini-pc. Monitoring the hardness testing process significantly improved by using modern user interfacing technology such as 10-point multi-touch screen operation supported by a fast & secure display connection. Combined with top quality components and a high performance mini-pc, this system guarantees customers a solid and accurate performance over many years to come. In this way, the DUROLINE V Vickers hardness tester series offers a highly functional and reliable automated indentation test & measurement system.
- Versatile Macro load range for HV/HK scales from 300gf up to 30kgf
- Closed-Loop Controlled load application by load cell technology
- Auto Measurement with Zoom Window for more accurate measurement
- Flexible Windows 10 based hardness test & measurement program 'N-Sure'
- Database generating test results and reports
- 22” Full HD Capacitive 10-point Multi-Touch desktop monitor
- Integrated high-res camera 5.0 MP with USB3.0 interface with zoom capability
- Integrated LED light source with controller
- Integrated Windows operated mini-pc, Intel, SSD specs
- Interface network USB (x4), Display port (x2), LAN (x1) and Wireless LAN
- Very robust opto-mechanical system
- New generation electronics and motors in full system integration ensuring reliable performance
- Service friendly, remote accessibility
- Meets latest ISO, ASTM and JIS standards

Versatile macro-load range for HV/HK scales from 300gf to 30kgf
By selecting between 9 loads steps for macro-hardness testing in Vickers or Knoop, any specimen can be tested and measured within the applicable standards. Fast and easy setting of loads by touch screen monitor menu icon.
Magnification range
Combining the excellent performance of the digital camera, LED illumination and software with a series of available objectives, the DUROLINE V Series provide correct measurement under any test load within the international standards.
'N-Sure' Test and Measurement Software
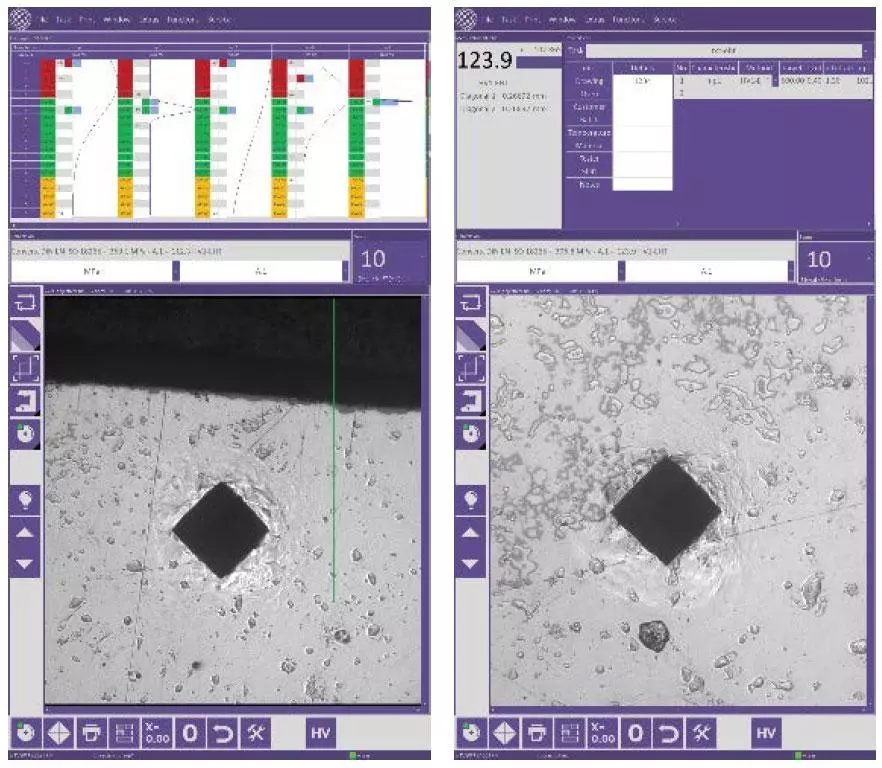
The 'N-Sure' software program features a flexible Windows based user interface that increases productivity and operator efficiency by automating the test & measurement process and optional motor-stage navigation process. Since the application and removal of the test loads and measurement are fully automatic, repeatability is excellent, testing time is reduced and throughput is increased. As a result, costly and time-consuming rework is eliminated.
For high-volume mounted sample testing, multi-sample mount holders are available to further increase the productivity and throughput of samples.
The easy-to-operate test & measurement program, clear images captured by integrated camera and high-resolution display on 22" touch screen monitor provide the lab staff easy access and shared visibility of indent results to analyse and discuss together. Operators are guided by the user-friendly program logic combined with quick system settings such as fast and easy setting of loads by touch screen monitor menu icon. Vickers or Knoop hardness values are automatically generated on screen by use of the standard provided Auto-measurement function.
Automatic Light Brightness
The light brightness is automatically adjusted for the best image quality and the most accurate auto measurements.
Automatic Evaluation
Diagonals of indentation are measured automatically and hardness value appear on the screen.
Database generating test results and reports
'N-Sure' software program provides advanced database management of test results, report generation and printing functions. Saving and retrieving measurement data is an absolute requirement when it comes to testing hardness results of critical components in various industrial segments. The N-Sure program ensures that data is safely stored and presented in standard or customized reporting form.

Factory Certificated Direct and Indirect Calibration Report
All DUROLINE V-Series testers are calibrated according to DIN EN ISO 6507-2:2018 Vickers hardness test standard.
Comes with ISO/DaKKs Certificated Vickers Indenter (Made in Germany)
An ISO/DaKKs Certificated Vickers Diamond Indenter is included as standard for all DUROLINE V-Series Hardness Testers.
Case Hardening Depth (CHD) Testing
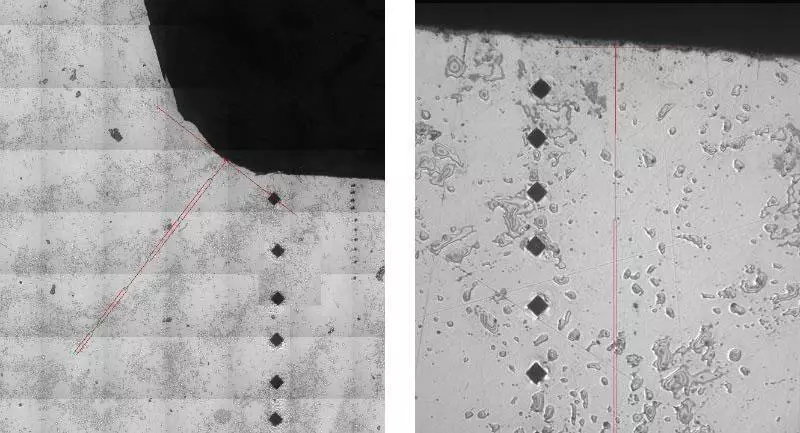
Case Hardening Depth Module is optionally available for DUROLINE V-series. DUROLINE V-series can be equipped with a Digital Manual XY-Stage that includes one Slyvac digital micrometer and one analogue micrometer. Readings from Slyvac micrometer is transferred to N-Sure software simultaneously. In this way, automatic features of CHD software module can be used.

Scanning Overview Image Feature
Mapping function allows overview image of complete sample surface. The test points are easily determined on the sample with pre-defined or user defined patterns.

Closed-Loop Controlled Load Application by Load Cell Technology
All DUROLINE V-Series testers equipped high technology closed-loop load cell system. Load cell system provides maximum accuracy and repeatability for all test loads without exceeding target load threshold.
High precision spindle
For accurate Vickers hardness testing, the elevating speed and backlash of the spindle are critical. By using quality components and design experience, the DUROLINE V Series spindles guarantee long life without loss of accuracy due to wear and friction, even for large and heavy specimens.
Automatic Light Brightness
The light brightness is automatically adjusted by the user interface software for the best image quality and the most accurate auto measurements. The hardness tester equipped with powerful LED light source and compact optic system to provide excellent image quality.
| DUROLINE V1 | ||
|---|---|---|
| Hardness Scales | Vickers HV as per ISO 6507, ASTM E384, E92 | HV0,3 - HV0,5 - HV1 - HV2 - HV3 - HV5 - HV10 - HV20 - HV30 |
| Knoop HK as per ISO 4545, ASTM E384, E92 | HK0,3 - HK0,5 - HK1 - HK3 | |
| Hardness conversions to other scales | As per ISO 18265 | |
| Test Loads | Test Loads (gf) | 300gf - 500gf - 1kgf - 2kgf - 3kgf - 5kgf - 10kgf - 20kgf - 30kgf |
| Test Loads (N) | 2,942N - 4,904N - 9,807N - 19,631N - 29,420N - 49,033N - 98,067N - 196,033N - 294,200N | |
| Test Load Accuracy | All loads within +/- 1,0% As per ISO standard (and ASTM E-384, ASTM E-92-17, JIS B7725, JIS B7734) | |
| Test Load Dwell Time | "from 5 - 99 sec with 1 sec increments As per ISO standard (and ASTM E-384, JIS B7725, JIS B7734)" | |
| Test Load Application Speed | For all loads not more than 0.200 mm/s As per ISO standard (and ASTM E-384, JIS B7725, JIS B7734) | |
| Load Force Application | Motorized force application with closed loop load cell control, Automatic load, dwell, unload | |
| Load Selection | By N-Sure test settings | |
| Turret | Turret Configuration | Motorized 3-mount turret: 1 indenter, 2 objectives Position Auto-indication |
| Indenter | Including 1 Vickers Diamond Indenter (ISO/DaKKs certified, Made in Germany) | |
| Objectives | "Standard objectives 10X, 40X, optional 5X, 20X (Made in Germany) Image capture by integrated CCD-camera (no eyepiece)" | |
| Optic System | Sample Image Capture | By Integrated CCD Camera, 5.0 MP, USB 3.0 (Made in Germany) |
| Indent Measurement Resolution | 0,00002 mm (0.02 μm) | |
| Illumination | Illumination Source | Built-in LED Light Source |
| Automatic Brightness Control | Standard for highest contrast and sharpnes | |
| Spindle | Z-axis (Spindle Vertical Movement) | Manual |
| Controller System | Controller | "Built-in Windows operated mini-PC, communicates the hardness tester electronics by CANBUS Protocol" |
| Interface Network | Interface network USB (x4), Displayport (x2), LAN (x1) and Wireless LAN | |
| Auxilliary | Optional Keyboard, Mouse (wireless) | |
| Monitor | "External 22” Full HD Capacitive 10-point Multi-Touch Desktop Monitor, IPS Panel, Antistatic Shield, Tiltable, Integrated Power Adaptor" | |
| User Interface | Operating System | Windows 10 |
| Test Settings | Scale, Load Dwell Time , Start, Turret positioning, Hardness Conversion, Illumination, Screen preference settings, Alerts for errors | |
| Measurement Settings | Surface Image capture, Indentation capture, Manual measurement and Auto-measurement, Single indents, Manual pattern, Preset pattern, CHD, EHT, NHT, GO/NG judgement, Statistics, Conversion, Cilindrical correction, Language, Database, Test Reports with image analysis data, Data export, User management, Service and Calibration Settings | |
| Tester Body | Operational Environmental Conditions | "Ambient Operating Temperature Range: 23°C +/- 5°C Ambient Humidity Range: RH 40% to 70% relative humidity, non-condensing" |
| Dimensions, WxDxH | 240 x 560 x 735 mm | |
| Specimen Accommodation | Vertical 223 mm, Horizontal (throat depth) 164 mm | |
| Weight | 75 kgs | |
| Mains | 100-240 V, 1-phase, 50/60 Hz, autosetting | |
Accessories
Test stages
The DUROLINE V Series feature various stages and fixtures that fit any application. Starting with the basic manual XY-stage with either mechanical or digital micrometers. The hardness tester can also be equipped with single or multi-sample holders to fix mounted specimens. To fix various geometries of specimen that are not mounted, there are several clamping devices available to finish job quick and precise.
Object Lenses
DUROLINE V equipped with 10x and 20x high quality German made object lenses for maximum image sharpness. 5x and 40x objectives are also optionally available for all kind of testing needs.
Test Blocks
ISO/DaKKS certificated German made test blocks are optionally available for Indirect verification of tester.
Indenters
ISO/DaKKS certificated German made Vickers and Knoop indenters are optionally available for most accurate and reliable testing.
Object Lenses, 5X/10X/20X/40X

GR 2041
GR 2042
GR 2043
GR 2044
Precision Vise (Opening 43mm)

GR 2025
Software Module for EHD, CHD Testing

GR 2081
ISO/DaKKs Certificated Vickers and Knoop Indenters

GR 2047
GR 2048
Specimen Holder for Mounted Samples Ø25/ 30/40/50 mm

GR 2031
GR 2032
GR 2033
GR 2034
Multiple Specimen Holder for Multiple Mounted Samples Ø25/30/40 mm

GR 2035
GR 2036
GR 2037
Flat and V Anvils

GR 2021
GR 2022
Manual XY Stages

GR 2023
GR 2024
Fine Specimen Holders

GR 2026
GR 2027
GR 2028
ISO/DaKKs Certificated Test Blocks

GR 2061
...
GR 2069
Certificated Calibration Scale Glass

GR 2071
Dimensions


