Globe Valve Maintenance or Repair - Grinding of a Globe Valve with Flat Seat
Regular maintenance of Globe Valves is crucial for ensuring their optimal performance and longevity. By regularly inspecting and cleaning the valves, potential issues such as corrosion, buildup of dirt and debris, or wear and tear can be detected and addressed before they lead to more serious problems such as leaks or malfunctions. A leaky or malfunctioning valve can cause significant downtime and negatively impact the overall efficiency and productivity of the system it is a part of. In addition, it can also pose safety risks and result in environmental hazards if the leaked material is hazardous or toxic. Therefore, regular maintenance of Globe Valves is essential for maintaining their reliability, preventing issues and ensuring the overall safety and efficiency of the system.
The below instructions are for use with the Model G Valve Grinding Tool
- Determine the internal diameter (A) and external diameter (B) of the seat and evaluate the angle, if necessary.
- Measure the distance (C) between the center of the seat and the top of the flange.
- Clean the valve to remove any moisture and dirt to ensure optimal performance of the machine and grinding material.
- If your G-machine is equipped with a pneumatic drive unit, verify that you have sufficient air supply at a maximum pressure of 8bar.
- Choose the appropriate driving head and grinding arms based on the measurement of A and B.
- Confirm that there is adequate space for the grinding head with arms to fit freely, specifically checking the clearance between the seat and the valve guide.
- If the seat width is greater than 25mm, use 50mm adaptor plates for the grinding heads. If the seat width is wider than 45mm, use 70mm adaptor plates. Otherwise, use the largest adaptor plates available.
- The numbers on the grinding head and arms are marked for proper assembly. The number on the head is located next to the slot where the arm should be mounted, and on the arm it is marked on the front top. Ensure that the arm and slot numbers match (e.g. 1 on 1, 2 on 2, etc.).
- After assembling the grinding arms on the driving head, check that there is adequate space in the valve for the driving head.

To assemble the mounting plate, begin by positioning the pointed grub screws on the clamp (A) so that they are visible 6-8 mm. Secure the mounting plate to the flange or valve body and secure it by tightening the clamp screw (B) to a torque of approximately 20 Nm. The mounting plate can be placed in any location around the flange, but ensure that all three grub screws (A) are properly locked onto the body.
If the flange has non-removable bolts, it is recommended to use the mounting device for narrow seats (part number 90 401 00).
Next, assemble the machine frame according to the provided illustration, ensuring that the drive shaft holder clamp (C) is located approximately 5 cm from the centre of the seat. This position will provide the drive shaft with an angle of 80° to 90° relative to the flange. Tighten the four screws (D) to secure the frame.
Ensure that the shaft is in its innermost position by tightening screw (E) on the brass bushing. Lock the brass bushing by tightening bolt (F) and loosen screw (G).
Place the driving head onto the drive shaft and ensure that the gears mesh properly. Slowly turn the head to check for proper engagement and lock the driving head in place by tightening centre screw (H) to a torque of 20 Nm.

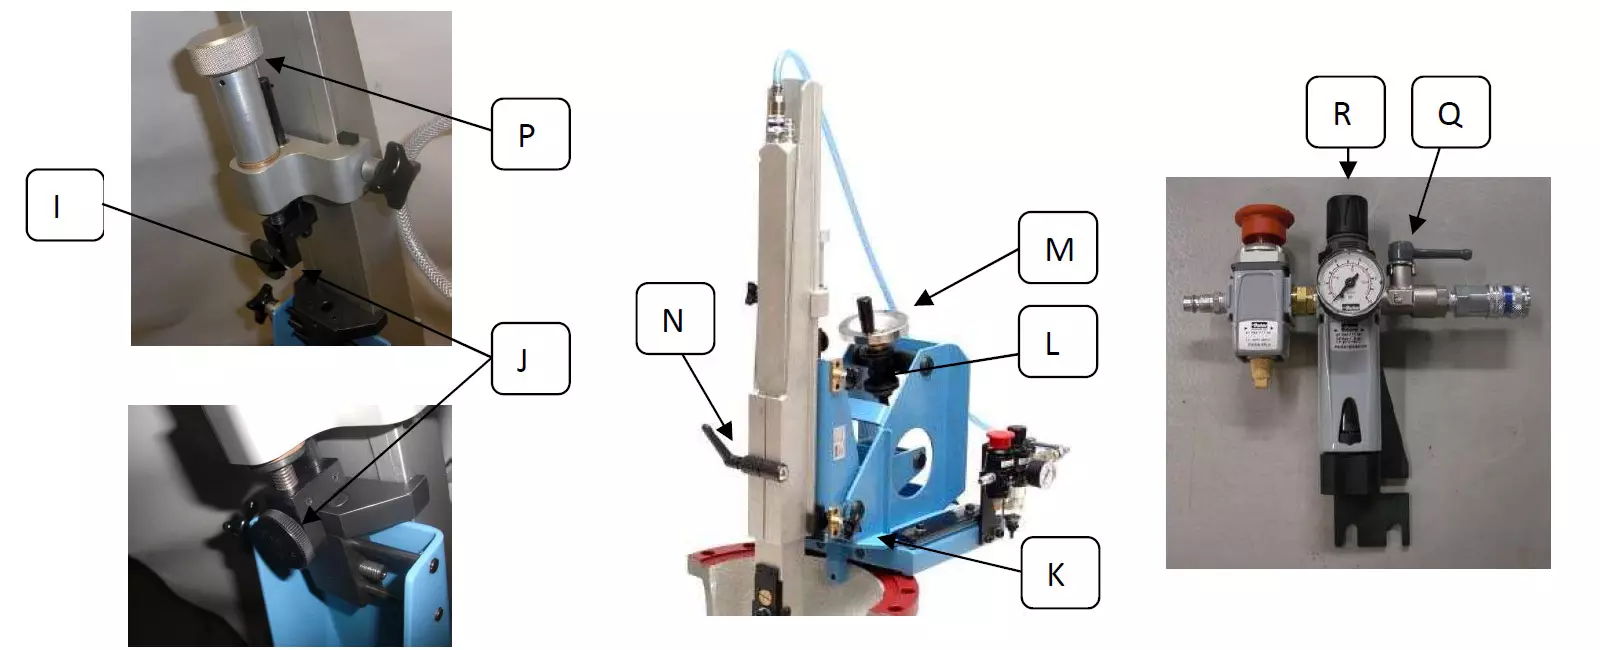
If necessary, release the tilt lock and mount the drive unit onto the machine frame. Slowly slide the unit into place and make sure that the fixed point depth adjustment clamp ball (I) falls into position. Lock the holder with clamp knob (K) and adjust the holder's position with the adjustment clamp. Use the side adjustment knob (L) and the grinding pressure knob (M) for horizontal positioning, and the drive shaft tightening handle (N) for vertical positioning. Once the drive shaft is in position, tighten screw (G) to stabilise the setup, then release clamp knob (K) by half a rotation. Adjust grinding pressure using knob (P) on the fixed point depth adjuster.
Mount the air regulator onto the wedge plate and connect the air hose. Ensure that the shut off valve (Q) is closed prior to connecting the air supply and that regulator knob (R) is turned counterclockwise. To activate the knob, lift it and then turn.
Start the machine by adding a light grinding pressure and rotating the driving head by hand. Check that there is sufficient space around the seat and then start the machine slowly by opening the shut off valve (Q) and turning the regulator knob (R) clockwise to reach a speed of 60-80 rpm. Use enough pressure, but not too much as the seat is usually narrow and will be done quickly. Change direction of rotation every 5-10 minutes to maximise the use of the grinding discs, adjusting the air input if necessary.
When changing grinding discs, stop the machine by turning off the shut off valve (L), disconnect the air hose, and release grinding pressure. Loosen the holder with clamp knob (K) and remove the entire drive unit from the valve to change the discs. Once the discs are changed, re-install the drive unit, tighten knob (K), reconnect the air supply, and resume the grinding process.
Finally, after completing the grinding process, inspect the machine for any damage and clean and dry all parts before returning them to the case. Verify that all parts are in the box before closing it.