Deburring Tips and Which Tools to use
What are Burrs?
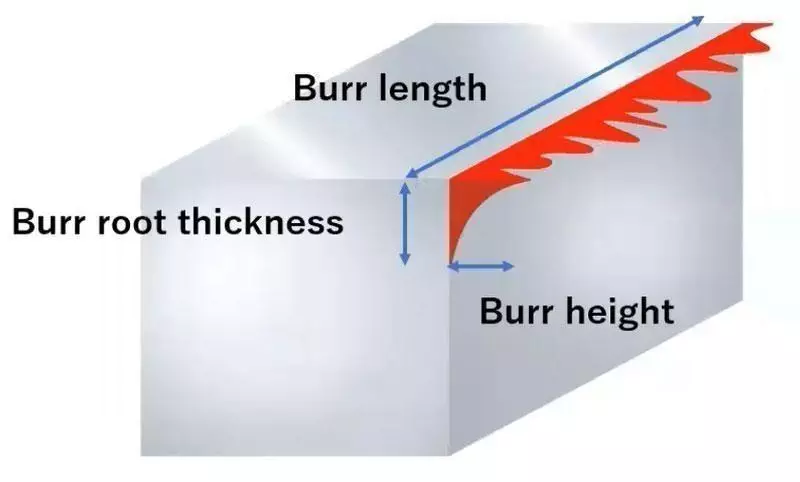
The definition of the burr is a protrusion of a material, such as metal or resin that is generated when it is processed. Burrs are normally generated after the mirroring process or during a process. As for the burr size, we express burr size by its height, thickness and length. In this article, we use the burr thickness to express the burr size. Burrs must be removed as they will cause issues, if not removed, they will cause parts to not slide, create oil pockets and will prevent lubrication. As for the appearance, burrs will scratch other burrs and other products, in the assembly process, measurement problems will occur and for the safety of the operator, burrs could cause injuries.
Burr size and direction
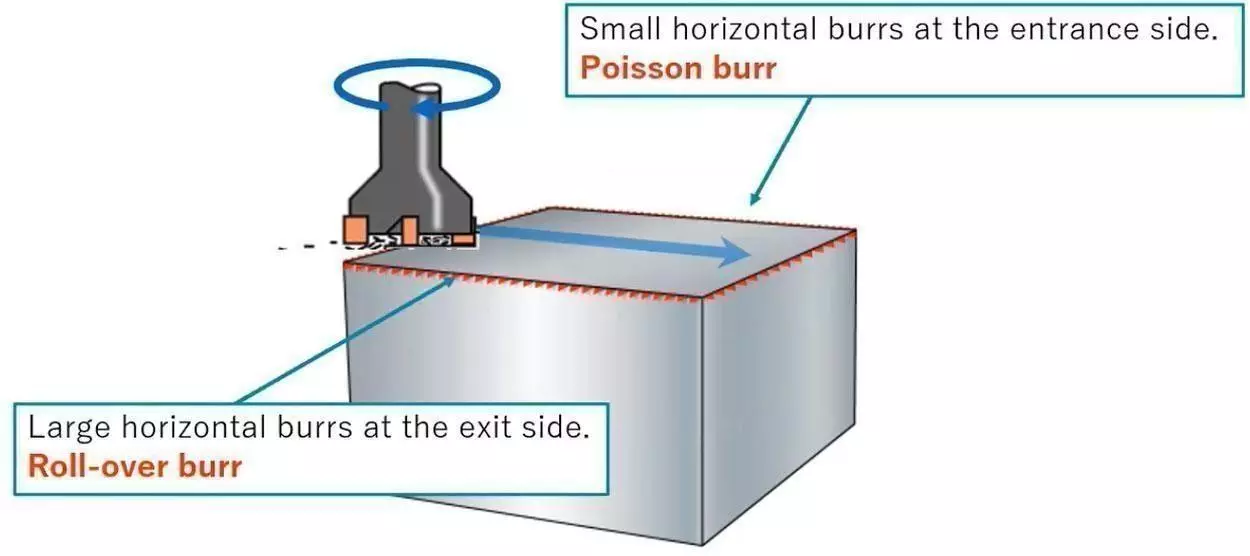
The burr size and direction depend on the process, for example in the mirroring process horizontal burrs are generated on the periphery of the surface, in this case burr size of the entrance side of the tools is different from the other side of the tools. At the entrance side, burrs tend to be small, on the other hand at the exit side, burrs tend to be big. As for the burrs generated at the entrance side, these are called Poisson burrs, at the end side, these are called Roll-over burrs. This mechanism is the same in the drilling process, in the drilling process, vertical burrs are generated at the entrance side, small Poisson burrs are generated and on the outside, large Roll-over burrs are generated.
How to measure the burr size?
Some common ways to measure the burr size is using a micrometer and caliper or a digital microscope. Measuring using a surface roughness tester will measure the burr size in the same way as you would measure surface roughness, but only very small burrs can be measured with this method. To measure burrs without any measuring equipment, you can use a method called replica, using a soft plastic material to lubricate the actual brush shape and see it under the microscope. Another method would be to check with a mechanical pencil or fingernail, if the burrs can be bent by your fingernail, it would be possible to use the xebec brush range for removing the burr. It's important to select suitable measurement tools, there are many ways to measure the burr size or edge conditions, so before selecting tools, it's better to decide how you evaluate the burr or a shape.
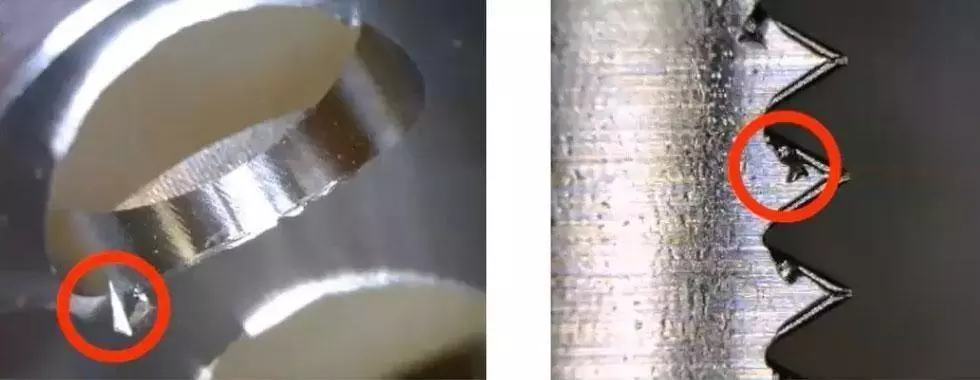
How do you check if all burrs have been removed?
A survey in 2018 from xebec, from over 450 operators, shows that 61% of them would check by touching with their fingers or visually looking using a magnifying glass. Using the measuring equipment methods in the previous section is also recommended. The same survey also asked the operators what would quantify the meaning of ‘remove all burrs’. 34% said that below 10-50 micron is acceptable and 26% between 50microns and 0.1mm.
How to minimise the burr size and control the burr direction
Minimising the burr size is important because the bigger the burrs, the fewer tool options you have to remove them.
Burr sizes are caused by the angle of the edge, the angle degree is crucial to the burr size. In most cases, the edge angle is 90 degrees, when the edge angle is steep, burrs get bigger, on the other hand, when the edge angle is shallow, burrs become smaller and smaller. No burrs are generated if the edge angle is exact to 150 degrees, sometimes you may experience very large burrs, it would then be recommended to change the edge angle of the cuttings tool to reduce the burr size.
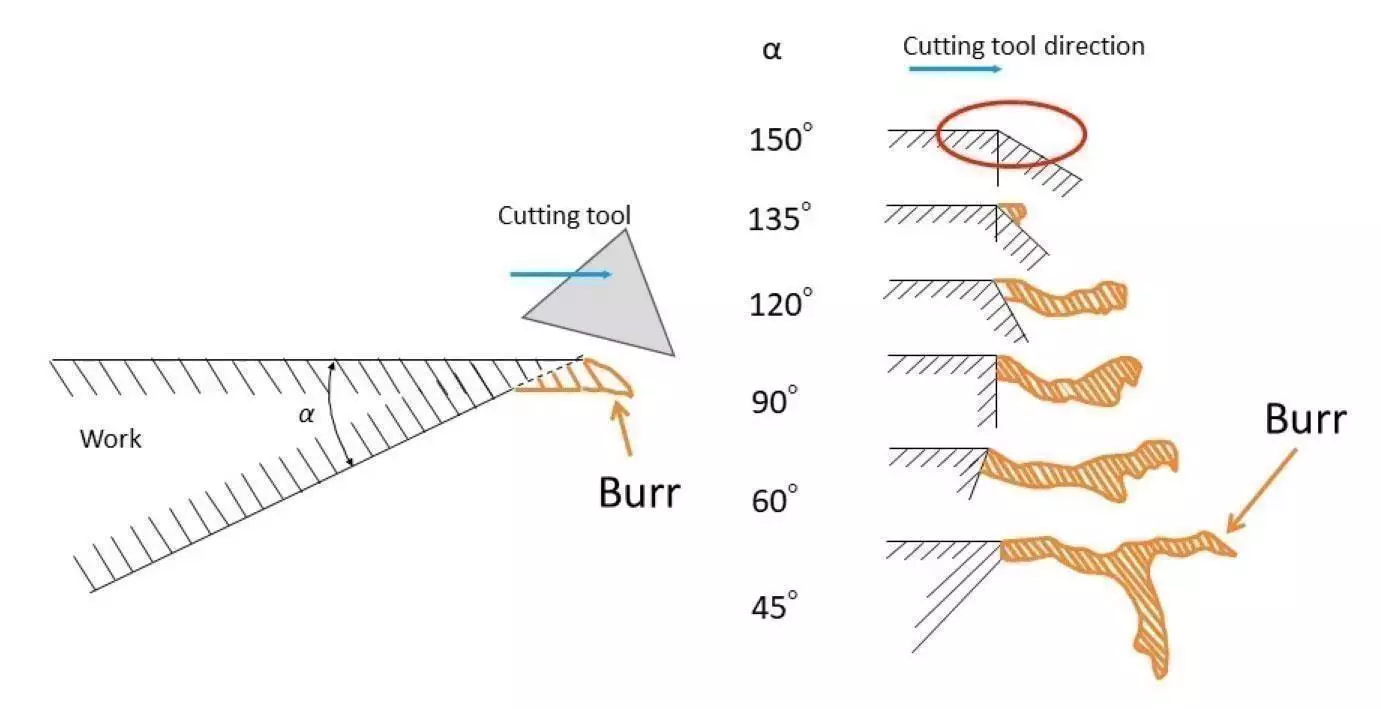
It's sometimes not easy to change the shape of the mould, you can try by making a little change on the cutting conditions. Changing the machining tool path or the cutting process will help make burrs smaller. When the cutting edge pushes outward against the workpiece edge, burrs are generated, these burrs are caused by deformation and they are called ‘roll-over burrs’. ‘Poisson burr’ is a burr generated when the cutting edge pushes in-wards on the work pieces.
Changing the processing condition
For face mirroring, reduce the depth of cut, if the depth of cut is 0.8 mm, the burr height is 1.34 mm and this would be too big to remove with the xebec brushes. As the depth of cut is reduced, burr size will also be reduced. So when using face mirror for finishing, we recommend to minimise the depth of cut as much as possible.
You can also try changing the drills, for example, a flat drill will help keep burrs smaller, it is also effective to reduce the feed rate of the drill just before it finishes at the end of the workpiece. The feed rate has an impact on burr size, when the feed rate is 320 mm/min the burr sizes are approximately 0.17 mm, but when the feed rate is 160 mm/min the burr sizes are much smaller, although operators worry about cycle time if the feed rate becomes slower, in which case we recommend you reduce the feed rate only when the tool is about to exit from the workpiece, in this way it's possible to minimise the burr size and avoid to extend the cycle time.
It is also important to control the direction of the burr, not only to minimise the burr size. By changing the order of operation, the burr direction can be changed, if you process the side walls first, the horizontal burrs are generated, to remove these burrs from above is not easy.
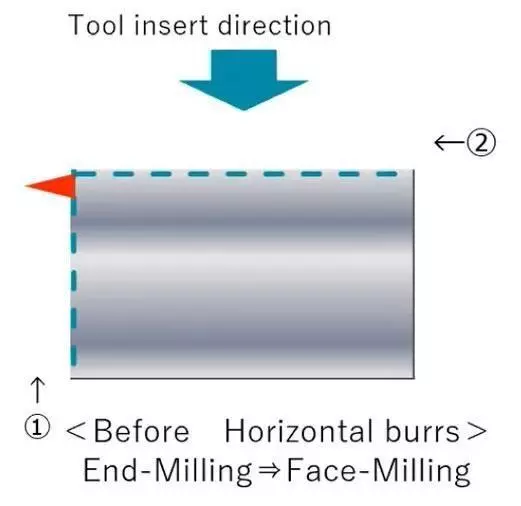
But if you change the order of operation, so the face mirroring first then the side wall second, vertical burrs are generated, this way is much easier to remove the burrs with the xebec brush.

It is same when you process the cross hole, if you are doing the small hole first and then through the large hole, burrs are pushed into the small hole.
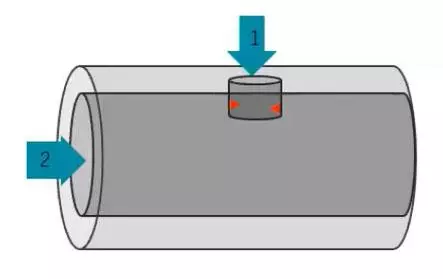
There are limitation of the tool type or tool size to be inserted from the small hole, so by changing the order of operation, large hole first and then small hole next, burrs are generated on the large hole, so you increase the number of tool types and sizes you can use to remove the burrs.

Which Deburring tool to use?
In this table, you can see each process and the burr size which is generated by that process. In the casting process or cutting process using a metal saw, the burr size is 0.5 mm to 2 mm maximum, in this case we need to use a rotary burr, but it may cause secondary burrs, in which you’ll then need to use other deburring tools to remove. In general cutting process, burr size is roughly 0.1 mm to 0.5 mm, in this case, sandpaper or pre-processing can be used, but it's time consuming. The honing process or super finishing process burr size is smaller than 0.1 mm, if burr size is smaller than 0.1 mm, it's much easier to remove and more deburring tools are available
| Burr root thickness (mm) | < 0.05 | 0.05 - 0.1 | 0.1 - 0.2 | 0.2 - 0.5 | 0.5 - 1.0 | 1.0 - 2.0 | 2.0 > |
|---|---|---|---|---|---|---|---|
| Super finishing |  | ||||||
| Honing |  |  | |||||
| Grinding |  |  | |||||
| Broaching |  |  |  | ||||
| Milling |  |  |  | ||||
| Turning |  |  |  | ||||
| Boring |  |  |  | ||||
| Drilling |  |  |  |  | |||
| Metal Saw |  |  |  |  |  | ||
| Pressing |  |  |  |  |  | ||
| File Finishing |  |  | |||||
| Forging |  |  |  |  |  |  |  |
| Casting |  |  |  |  |  |  | |
| Welding - Fusing |  |  |  |  |  |  |  |
| For these sizes of burrs, most deburring tools are available | Vibratory Tumblers can be used for these burr sizes (although time consuming) | Rotary burrs can be used for these sizes (although secondary burrs can be generated) | |||||
To remove the burrs in cnc machining, it's important to minimise the burr size as much as possible. When cutting tools are new, burrs tend to be small, but when tools wear out, burrs become larger. To achieve automatic deburring in cnc machine it's important to keep burrs small by changing tools regularly.
These solutions should help you minimise the burr without changing too much, of course the processing condition or generic tools are important, but we should know that making changes on cutting processes could help control burrs too.


